
Getting started on Community Manager
Welcome to Community Manager, the heart of your Pluss Communities app where you can design, build and manage your community’s communications and userbase.
Getting started.
-

Login to Community Manager.
-

Explore the Dashboard.
-

Personalise with the Feature Picker.
-

Setting up multi-factor authentication.
Login to Community Manager.
To login to Community Manager:
Visit the URL that has been supplied to you by a member of the Pluss Communities team.
Enter your email / mobile and password.
Click ‘Login’.


Explore the Dashboard.
Welcome to the Community Manager dashboard. The place where all the magic happens! Your dashboard is the central hub for you to manage how your community is interacting and performing. It is the access point for all your important features so it’s a great place to get started.
Features of the dashboard include:
Left hand menu > the place to navigate through the different features of your app to start creating content.
Here you will find:
Dashboard
Users
Analytics
Feature Picker
Branding
Settings (click on ‘Feedback’ to view and manage user feedback)
App Features
Sign-ins
Payment
TVs
Feature picker > the Pluss Communities intuitive feature picker where you can quickly choose features and design styling that are perfect for your community.
Dashboard banners > latest updates from the Pluss team.
Community stats > snapshot analytics of recent activity.
Community insights + news > latest posts from the Pluss blog.
Latest activity > a log of activity by staff users and user comments. Click on ‘View all Activity’ to read and reply.
Top right menu > where can view your own user profile and logout of Community Manager.
Help Guide > your go-to resource for support managing the Pluss platform, featuring a range of ‘how to’ resources and demo videos.
Personalise with the Feature Picker.
Every community is different, and so every community app will need different features and functions, set out in an order that makes sense to you. With our intuitive feature picker, you can quickly choose features that are perfect for your community.
Choose your app options.
Select the ‘App Options’ button above the mobile device to customise the name and design elements of your app.
The App Information section allows you to customise the following:
Community Name
Logo
Colour of the app buttons > click on the ‘colour picker’ to select the colour or type in the colour value. Alternatively, click the ‘quick choices’ button to select a colour swatch.
Footer > select the ‘Customise Footer’ button to select either a white footer or a colour from the ‘block’ menu. Here you can choose from the vibrant, soft and picker options, or type in the colour value. Click ‘Done’ once you have selected your colour choice.

The Header Style section allows you to choose from the following options:
White header
Block colour > which will match the colour of your pre-selected app buttons
Gradient
Pattern > after selecting this option, click on the ‘Settings’ button to select your pattern choice. You have the option of selecting a custom pattern colour or to upload an image as your pattern. Click ‘Done’ once you have selected your pattern choice.
Click the ‘Save Options’ button once you are happy with the design elements of your app.

Choose your app layout.
You can select either the default layout or grid layout.
If you are selecting the gride mode, select whether you would like a coloured background to appear.

Choose your community’s features.
Now the exciting part! It’s time to select the features that are a perfect fit for your community.
You might like to select a template option from the ‘Use Template’ button at the top right of screen. Otherwise you can go ahead and begin selecting your features.

Choose the features for your home page.
The feature picker will begin on your home page and a range of preselected features will be listed in the left column.
Click the plus button (+) for each feature that you would like to include.
Click the cross button (x) to remove any features that you do not wish to use.
Edit the name of your feature by clicking the pencil icon.
Reorder your selected features by clicking the up and down arrow buttons.
Click on the settings icon to view and modify the settings for each of your chosen features.
Change the icon for the main menu by clicking it at the top left of screen and selecting a new one.
The features and layout for the home page of your app are now ready to go. Let’s go ahead and choose the features for the remaining menu items.

Choose the features for your different menu items.
Select the next menu item along at the bottom of the screen (to the right of ‘Home’) to begin choosing the features.
To rename each of the different menu items, click the text box at the top left of screen (next to the icon) and edit it to your chosen name.
Change the icon for this menu item by clicking on it and selecting a new one.
Repeat this process for each of the different menu items that appear in the footer of your app by selecting the different tabs.
To remove a menu item, click the ‘Hide page’ button at the top right of screen.
To add a menu item, click ‘+ Add New Page’ at the bottom of screen. This button will become visible when you have enough space in your footer for additional pages.

Choose the features for the ‘More Menu’.
The ‘More’ tab allows you to choose all of the features that you wish to include in the More Menu.
Click the features to make them active or inactive.
Change the icon for the more menu by clicking on it at the top left of screen and selecting a new one.
To disable this feature, turn off the ‘More menu’ button.
Click the ‘Save App’ button at the top right of screen to save this app layout.

Create different layouts for different community groups.
The Pluss Communities app gives you the freedom to create different app views for the different member groups within your community.

From the Feature Picker:
Click the plus icon (+) next to the App Views menu at the top right of screen.
Enter the app view name.
Select the user type/s who you wish to be assigned to this app view.
Click ‘Done’.
Now repeat the app set-up process above.
Once you have finished, click the ‘Save App’ button at the top right of screen to save this app layout.
Save and publish your app layout.
Now that you have finished selecting your community’s features, click on the ‘Save App’ button.
Head back to the dashboard by clicking the back arrow at the top left of screen.
The features of your community’s app are now visible – very exciting!
Features fun fact!
Did you know, you can rename features to be called whatever you want? That’s right, you have the freedom to call your features whatever makes sense to your community. Simply click the pencil icon next to the feature name to modify it. Here at Pluss, we are all about choice.

Setting up multi-factor authentication.
Administrators of Community Manager have the option of setting up multi-factor authentication for increased protection of your account. As part of the set-up process, you will be required to use an authenticator app which can be downloaded from the app store. We recommend using Google Authenticator.
Follow these steps to complete the set-up process.
Login to Community Manager.
Click the menu icon in the top right corner of the dashboard, to open the pop out menu.
Select ‘Profile’.
At the bottom of your profile you will see Multi-Factor Authentication.
Select ‘Click here’ to start the set-up process.
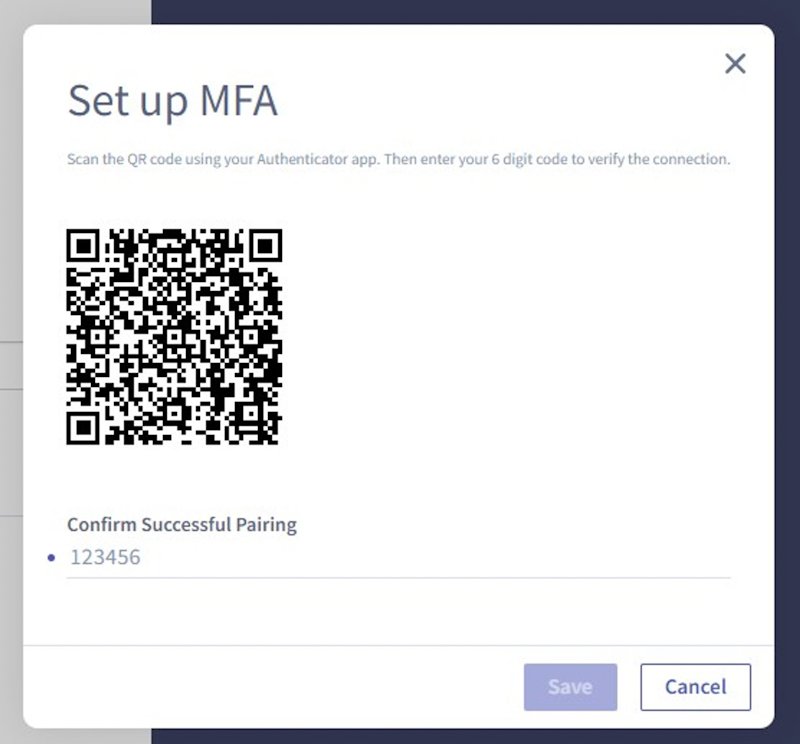
Open the authenticator app.
Scan the QR code that you see on screen.
Enter the code from the authenticator app.
Select ‘Save’.
Now, navigate back to the dashboard and from the pop out menu:
Select ‘Logout’.
Login to Community Manager.
Enter the same code from the authenticator app.
Your multi-factor authentication set-up is now complete.


Handy resources.
Benchmark your community’s success with the Pluss Community App Maturity Model.