

The Facilities feature.
Elevate community living: Explore our Facilities feature user guide.
Explore the Facilities Feature.
-

Set-up a facility booking.
-

Create a facility.
-

Explore the Facilities dashboard.
-

Manage your bookings.

Setting up facility bookings.
Your Pluss Communities app has the power to manage the entire booking process of your community’s facilities.
To create a bookable facility, follow these steps:
Set-up your booking type/s.
Set-up your calendar.
Block out times when the facility is not available.
Create a new facility.
Manage your bookings.
If your facility does not require in-app bookings, skip ahead to step 4 and follow our step-by-step guide on creating a new facility.
Create a new booking type.
To create a new booking type, from the dashboard:
Click the ‘Bookings’ feature by clicking the link in the left side menu.
Select ‘New Booking Type’.
Add the name of your booking type in the ‘Title’ box (eg 1 Hour Tennis Court Hire).
Add further information in the ‘Description’ box.
Enter the length of booking in hours and minutes.
Enter the booking time slot interval in hours and minutes (optional). For example, limit bookings to specific times on the hour (e.g., 9:00, 10:00) instead of every 15 minutes (e.g., 9:00, 9:15).
Set-up a facility booking.

Further options are available including:
Payment > Enter the price to hire this facility.
Cancellation > Add any cancellation policies.
Reminders > Select if you would like any reminders to be sent and how far in advance.
Now click ‘Save’ at the bottom right of screen.
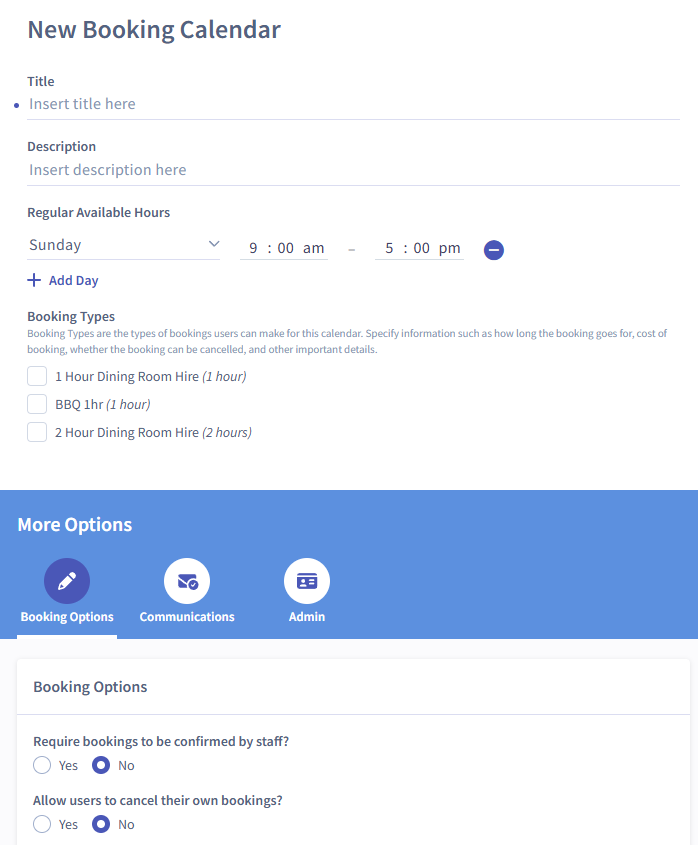
Create a new calendar.
To create a new calendar, from the Bookings dashboard:
Select ‘New Calendar’ from the left side menu.
Add the name of your calendar in the ‘Title’ box (eg Tennis Court Hire).
Add further information in the ‘Description’ box.
Select the available days and hours that this facility is open for bookings.
Select the relevant booking type/s.
Booking Options: Select if you would like to confirm bookings after they are requested.
Booking Options: Select if you would like users to be able to cancel their own bookings from the app.
Communications: Select if you would like to be emailed when a booking is made.
Communications: Select if you would like users to receive a confirmation email when making a booking.
Admin: Add any additional Admins who you give permission to manage this calendar.
Now click ‘Save’ at the bottom right of screen.
Block out times.
If there are certain times when your facility is not available for bookings, use the ‘Block out’ tool to set-up these blocked out times.
From the Bookings dashboard:
Select ‘Block Time’ at the top left of screen.
Choose the relevant calendar from the drop-down list.
Select the relevant date.
Enter the time period to be blocked out.
Click ‘Save’ at the bottom right of screen.

Now that your calendar set-up is complete, it’s time to create your facility listing.
Create a facility.
To create a new facility, from the dashboard:
Click the ‘Facilities’ feature by clicking the link in the left side menu.
Select ‘New Facility’ at the top left of screen.
Add the name of your facility in the ‘Title’ box.
Add further information in the ‘Description’ box.
Upload an image by selecting the ‘Upload an Image’ or ‘Upload File’ button. Alternatively, click on the ‘Image Library’ button to select an image from your app library.

Further options are available including:
Details > Enter a location and select the relevant category from the drop down list.
Audience > Select either all users or a custom audience.
Publish Options > Select if you would like a notification to be sent.
Booking Option > Select ‘Yes’ if your facility has a booking option and choose the relevant booking type from the drop-down list.
In app bookings > Enter your button text and tick your relevant booking calendar.
External booking link > Enter the booking URL and button text.
In app request form (via email) > Enter the notification email address, button text, and add relevant wording for the confirmation pop-up (optional).
Opening Hours > Select ‘Add Day’ to choose the days and times that the facility is open.
Contact Details > Include the name, phone number and email of the relevant contact person.
Attachments > Select ‘Add Link’ or ‘Upload a File’ to include any relevant attachments and links to external websites.
It’s now time to publish your facility, by clicking the ‘Save’ button at the bottom right of screen.


Explore the Facilities dashboard.
All of your facilities are listed in the ‘View Facilities’ dashboard.
To edit the facility click the pencil icon or click on the facility title.
To delete the facility click the dash icon.
Click on the graph icon to view analytics about your facility including page views and user reactions.
Click the ‘Active’ button to make this facility active or inactive.

Manage your bookings.
To manage your facility bookings, from the dashboard:
Click the ‘Bookings’ feature by clicking the link in the left side menu.
Select ‘View Bookings’ at the top left of screen.

All bookings are visible on the bookings dashboard and can be filtered by date range, cancelled bookings, calendar type, booking type or a single user.
Making a booking.
All staff users have the flexibility to create a facility booking on behalf of a user from the Bookings dashboard.
To make a booking:
Click ‘New Booking’ at the top left of screen.
Select the relevant booking calendar.
Select the relevant booking type.
Choose the date you wish to book.
Select the relevant time.
Select the relevant user.
Click ‘Save’.
The booking has now been made.

Cancelling a booking.
Users have the option of cancelling a booking from within the app or a staff user can cancel a booking on their behalf from the Bookings dashboard.
To cancel a booking:
Select ‘View Bookings’ at the top left of screen.
Click the relevant booking ID.
Select ‘Cancel Booking’.
The booking has now been cancelled.

Image tip!
For best quality images with minimal cropping, we suggest using landscape images. If you need help creating that perfect snap, which not try our Canva image template? Simply click the ‘Notes’ button at the bottom left of the template screen for step by step instructions.
Further image specifications are available in the Media Guide.
