

The Groups feature.
Unlocking community connections: A guide to using messaging groups.
Explore the Groups Feature.
-

Create a group.
-

Message group members.
-

Explore the Groups dashboard.
-

Create a group (from the app).
To create a new group, from the dashboard:
Click the ‘Groups’ feature by clicking the link in the left side menu.
Select ‘New Group’ at the top left of screen.
Add the name of your group in the ‘Title’ box.
Upload an image by selecting the ‘Upload an Image’ or ‘Upload File’ button. Alternatively, click on the ‘Image Library’ button to select an image from your app library.
Search and select the members that you would like to be part of this group.
Assign which members you would like to be ‘Admins’ of the group (Admins can add or remove group members).
Select if you would like this to be a public group (this will allow anyone in the community to view and join the group).
Click ‘Save’.
Create a new group.

Message group members.
Messages can be sent to the group members from Community Manager, as long as you are a member of the group.
To send a message, from the Groups dashboard:
Click the group name.
Type the message in the ‘Enter Message’ box at the bottom left of screen.
Click the paper plane icon to send.
To upload an image, click the camera icon.
To upload a file, click the paperclip icon.


Explore the Groups dashboard.
All public groups (and personal private groups / messages) are listed in the Groups dashboard.
To edit the group click the pencil icon.
To delete the group click the dash icon.
Filter through the different groups, by selecting the group filter tags.

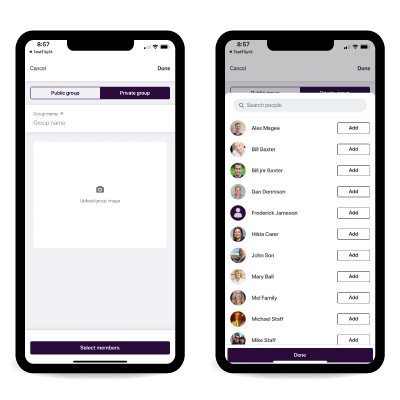
Create a group (from the app).
To create a group:
Click the circled plus icon at the bottom right of screen.
Select ‘Group’.
Select either ‘Public Group’ or ‘Private Group’ (public groups will allow anyone in the community to view and join the group).
Add the name of your group in the ‘Group Name’ box.
Add a photo by clicking the camera icon. Select the ‘camera roll’ button to access photos from your mobile device.
Click ‘Select Members’ to add the members of your group.
Click ‘Done’ once you have finished selecting your group members.
It’s now time to create your group, by clicking the ‘Done’ button at the top right of screen.
Once your group is created, click the icon in the top right corner (three dots) to view members and attachments, manage members, mute notifications and leave the group.

Important information about groups.
> All public groups are visible in the Community Manager groups dashboard.
> Private groups will not be visible, unless you are a member of the group.
> You need to be a member of the group to message group members (even as a staff user).
> Users can upload images to a group when using the app.
> Attachments such as meeting minutes can be uploaded to a group from Community Manager (staff users can do this, or you can give power users permission).
> Admin members of the group can add and remove other members.
