
Managing your users
Manage your community members with ease with the Pluss Communities Users Feature.
Explore the Users Feature.
-

Add a new user.
-

Managing your users.
-

Invite codes.
-

User types.
-

Terms and conditions.
-

Uploading your users (bulk upload).
-

User tags.
-

Sign up questions.
-

Profile information.
Add a new user.
To add a new user:
Enter the Users dashboard by clicking ‘Users’ in the left side menu.
Select ‘New User’ at the top left of screen.
Enter the following details:
Name
Site
User type (further details on user types are listed below)
Birthday (optional)
Phone number
Email
Upload an image of the user by clicking the ‘Upload an image’ button (optional - they will be prompted to do this upon login).
Click ‘Save’.

Important information about creating a user.
1) You must enter a name and either a phone number or email in order to be able to create a profile that can be used by a member of your community.
2) If you have two users, who might live together but want to share a profile login, then you can do this by creating a joint name for them.
3) If you have two users who might live together, who only have one email or mobile number between them and you need to set them both up with a profile then use the email address for one user and the mobile for the other user. Giving them both the same email and mobile will cause an error message.
Managing your users.
Every member of your community can be found in the ‘View Users’ dashboard. To find a member, type their name into the search bar and then click on their name or the pencil icon to view and edit their profile.

Here you can view details including:
Name
Contact details
Birthday
User type
Profile image
Visibility in the app
Emergency contacts
Notes and documentation
Welcome text and email details
Date joined
Initial password
Linked users
Invite code

Welcome email / text
Users can be invited to join your community’s app with a welcome email or text. When you create a new user, the welcome email / text will automatically be triggered to their relevant email address and phone number. To manually send either of these, click the buttons in the right side menu.
If you would like to modify the welcome email, please get in touch with your assigned community manager.
Linked users
Family members of the primary users are encouraged to download the app as a way to stay better connected to their loved ones. Linked users are visible in the right side menu of the primary user.
To link a user, either:
Create and link a new user > Enter the name, contact information and linking details and then click ‘Create new user and link to (primary user name)’.
Find and link an existing user > Type the name of the user that you wish to link in the search bar, then select their relationship status and click ‘Save’.

Invite codes for each user are listed at the bottom of the right side menu. Anyone who signs up using this code will be created as a linked user to this primary user. Linked users can join your community by first downloading the app from the App Store and then clicking the ‘I have an invite code’ button on the login screen. They can then enter their invite code and follow the prompts to create their profile.
Export users to CSV file
All users can be downloaded as a CSV file. To do this, from the View Users dashboard, click the ‘Export CSV’ button at the top right of screen, select the columns that you would like to include, and then click ‘Confirm’.
Analytics
Analytical information about your users can be viewed by clicking the ‘Analytics’ button in the left side menu.
This includes information on:
User numbers
User types
Linked users
Users that are waiting to be linked to primary users
Failed login attempts

Invite codes.
The full list of invite codes for your users can be viewed by clicking the ‘Invite Codes’ button in the left side menu.
Create a new invite code.
To create a new invite code, from the Invite Codes dashboard:
Select ‘New Invite Code’ at the top right of screen.
Select user type from the drop down list.
Enter the expiry date.
Add any user tags.
Click ‘Save’.
To edit the details of your user code, either click the code number or pencil icon.
User codes can be deleted by clicking the dash icon.

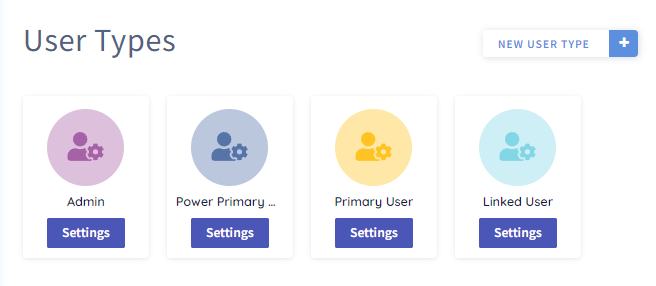
User types.
There are different user types set-up for each community group to allow for different access levels. These can be viewed by clicking the ‘User Types’ button in the left side menu.
These user types include:
Master User - has full permissions over the site and can set up sub communities.
Admin User - has the capacity to manage most things within the web portal on behalf of the community but does not have the capacity to manage things like feature picker.
Power Primary User - has the capacity to submit events and news for approval.
Primary User - this is typically a member or resident with very limited permissions and no permissions to access the web portal.
Linked User - a family member who has an interest in staying connected to what the primary user is doing in the community and may have some capacity to act on behalf of the primary user.
Click the ‘Settings’ button on each user type to view and edit the selected permissions.
Terms and Conditions.
All users who download your community’s app will agree to the set terms and conditions when registering their account. View and edit the full list of terms and conditions by clicking the ‘Terms & Conditions’ button in the left side menu.
Once you have finished updating your terms and conditions, simply click ‘Save’ to make these live.

Uploading your users (bulk upload).
The fastest way to add users to your community’s app is to perform a bulk upload from a CSV file. This can be done by clicking the ‘Bulk Upload’ button in the left side menu.
Ensure that the columns/fields and header details of your CSV file match exactly those as seen in the screengrab below (including capitalisation).
Name (first name and last name in one field)
Phone Number (beginning with ‘+61’ and drop the ‘0’)
Email (without any spaces at the end)
Address
Birthday (ddmmyyyy)
User Type (Master / Admin / Power Primary User / Primary User / Linked User)
Tags (separated by comma)
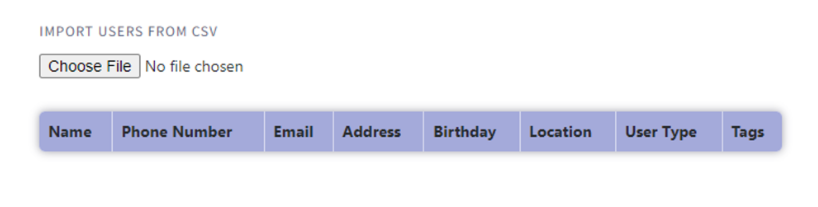
The CSV file can be uploaded with the following fields left blank:
Address
Birthday
Tags
Please contact a member of the Pluss Communities team to get assistance with uploading your users.
Check uploads
Full details of bulk uploads that have been performed will be stored in the ‘Check Uploads’ section which can be accessed via the left side menu.
User tags.
User tags are a great way to reach certain segments of your community. These can be managed in the ‘User tags’ section found in the left side menu, in addition to each user’s profile.
Select ‘+ Add Tag’ to create a new tag.
Select ‘Edit Tags’ to edit existing tags.

Sign up questions.
Sign up questions can be created for your Pluss Communities app when you would like to gather additional data from your users. To add sign up questions, contact a member of the Pluss Communities team.

Profile information.
The app offers expanded resident profile capabilities so that both staff and residents can grow a deeper understanding of one another. You can manage the fields displayed on residents’ profiles from the Profile Information page.
To manage this:
Select ‘Profile Information’.
Select ‘Add New Field’.
Type the field name (eg ‘Hobbies’).
Check the box if you would like the field to be ‘Only visible by staff’.
Check the box if ‘Residents can fill in this field from the app.’
Select ‘Save.’
The custom field has now been added to each resident’s profile.

To edit the details of each custom field:
Select ‘View Users’.
Click on the user name to open their profile.
Select the ‘Visible Profile’ tab.
Enter their custom field details (eg ‘Hobbies’).
Select ‘Save’.
The profile has now been updated.

Staff and residents can access this information within the People feature of the app.
Please note: Only staff will see this information if you checked the box ‘Only visible by staff’ in the set-up.
To view the resident’s profile, from the app:
Navigate to the People feature.
Select the resident’s name.
The resident’s full profile is now visible.
