
Setting up a Community TV
Your community’s hub is the perfect place to feature your virtual community on the big screen (connected using either an Apple TV or Google Chromecast TV).
Setting up your TV.
-

Setting up your Apple TV.
-

Setting up your Google Chromecast TV.
-

Customise your tv view with the Pluss Communities TV app.

Setting up your Apple TV.
What you need
Apple TV with remote control
HDMI 2.0 cable
Smart TV or other display with HDMI port
Internet access

TV settings
Set the correct time zone.
Remove the sleep function.
Remove the inactive mode.
Ensure Apple App Store is set to ‘Auto Update Apps’.
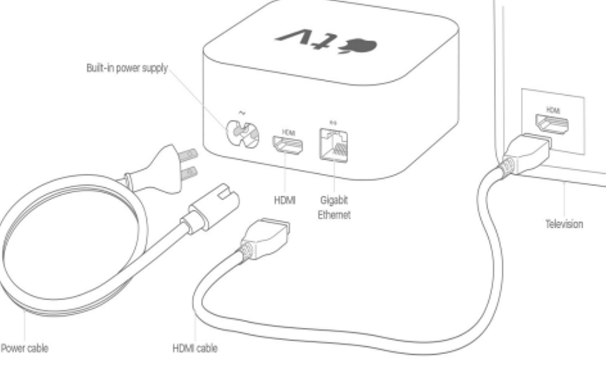
Connecting the Apple TV
Plug in the Apple TV and connect it to the smart TV with the HDMI cable.
Turn on the TV and select the HDMI input that the Apple TV is connected to.
Apple TV remote basics
To move around the screen, swipe up, down, left or right on the upper portion of the remote (labelled ‘Glass Touch Surface’).
To select an item, highlight it, then press down on the Touch surface.
To scroll through lists, quickly swipe up or down multiple times.
Menu:
Press one time to wake your Apple TV if it’s asleep.
While browsing, press one time to return to the previous screen.
Press and hold to go to the Home screen.

Connecting your Apple TV to the internet
From the Home screen:
Click ‘Settings’.
Click ‘Network’.
Select the relevant WIFI account and enter the password.
Click the Menu button to return to the home screen.
If you don’t wish to connect to WIFI during the set-up process, you can connect your Apple TV to the router with an Ethernet cable.
Your Apple TV is now set up and ready to download the Pluss Communities TV app >
Setting up your Google Chromecast TV.
What you need
Chromecast with Google TV and remote control
HDMI 2.0 cable
Smart TV or other display with HDMI port
Internet access

TV settings
Set the correct time zone.
Remove the sleep function.
Remove the inactive mode.
Ensure Google Play Store is set to ‘Auto Update Apps’.
Initial Google Chromecast TV set-up
Before you set-up, please ensure that you have the following:
Latest version of the Google Home app.
Latest version of the Google app.
A Google account.
Smart TV or display device with a HDMI input.
Mobile device or tablet (must support a 5GHz connection set-up Chromecast on a 5GHz connection. Note: A WPA2-Enterprise network is not supported).
Connecting the Chromecast TV
Plug one end of the USB power cable into your Chromecast and the other end of the cable into the power supply. Use the USB power cable and power adapter that is included in the box for optimal performance.
Plug the Chromecast into any open HDMI input on the TV.
Plug the power supply into an open socket.
Setting up the Chromecast TV
Download and install the Google Home app on your Chromecast supported Android device.
Open Google Home.
Tap ‘Add +’ at the top left of screen.
Select ‘Set-up device’.
‘Select ‘Set-up new devices’.
Follow remaining steps.
Your Google Chromecast TV is now set up and ready to download the Pluss Communities TV app >

Customise your tv view with the Pluss Communities TV app.
Downloading the app
Navigate to the Apple App Store / Google Play.
Search for the ‘Pluss Communities TV’ app and select download.
Open the ‘Pluss Communities TV’ app where you will see your activation code (if this does not appear, check your WIFI).
Now, from your desktop / laptop:
Login to Community Manager.
Select ‘TVs’ in the left side menu.
Enter the six-digit activation code.
Click ‘Save’.
From the pop-up window, select the TV you wish to connect.
Click ‘Save’.

Customising your first TV View
Login to Community Manager.
Select ‘TVs’ in the left side menu.
Select ‘Configure TV Views’.
Select your preferred TV features.
Click the pencil icon to rename the different features.
Use the arrows to reorder the layout of the features.
Turn the ‘Portrait Mode’ toggle on to change from landscape to portrait orientation.
Select ‘Save View’.

Creating additional TV Views
Select the plus icon at the top right of screen to create a new TV View.
Enter the view name eg Restaurant.
Click ‘Done’.
Now, repeat the set-up process above.
Note: Each new view requires a separate plug-in device for each activated TV.

Adding more TVs to your community
If you would like to add more TVs to your community, simply purchase an additional Apple TV / Google Chromecast TV and repeat the set-up process above.